OpenCV (Open Source Computer Vision Library) is a powerful open source library of computer vision algorithms.It is widely used by many technologies, such as image acquiring (e.g. Webcam capture), image processing (e.g. noise reduction), image detection (e.g. face detection), image recognition (e.g. OCR), and so on. Since all OpenCV source code is on GitHub, let’s get the copy and build the source code ourselves for fun.
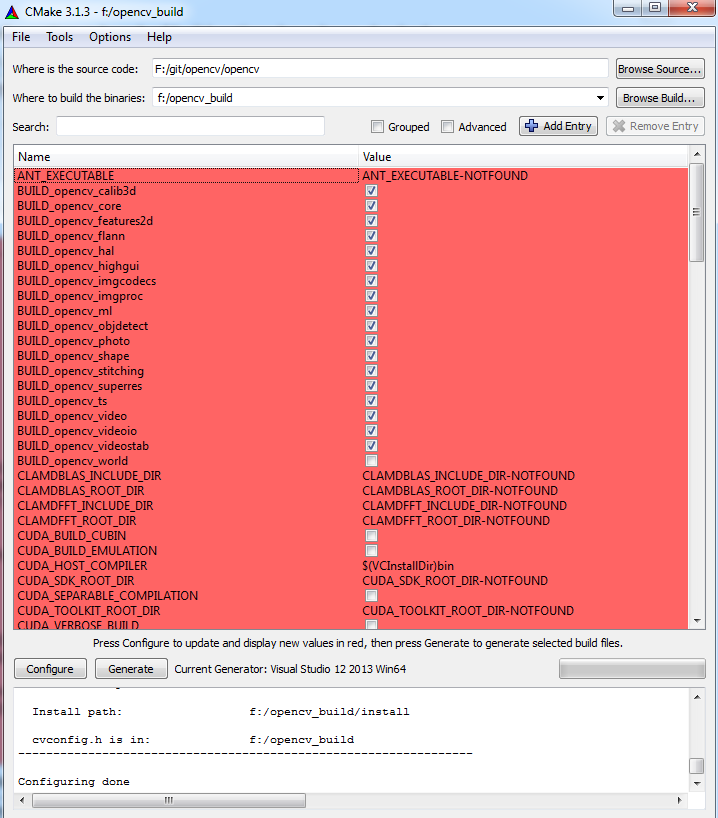
To facilitate the building work, we just need to launch CMake-GUI. Specify the source code path and the target build directory.
Click Configure, and specify the generator for building. I’m using Visual Studio 2013.
After that, you will see a bunch of checked options.
You are free to select any build modules you like, and then press Generate to generate build files.
Building OpenCV Source Code with Visual Studio
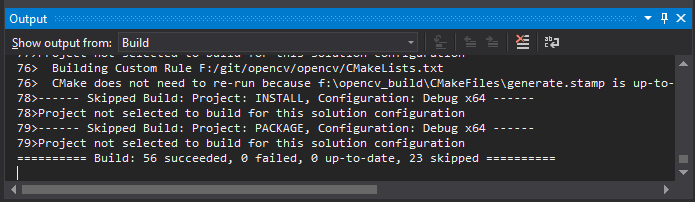
Open OpenCV.sln with Visual Studio.
Now you just need to click Build Solution. Wait for a while, and then you will see the final results:
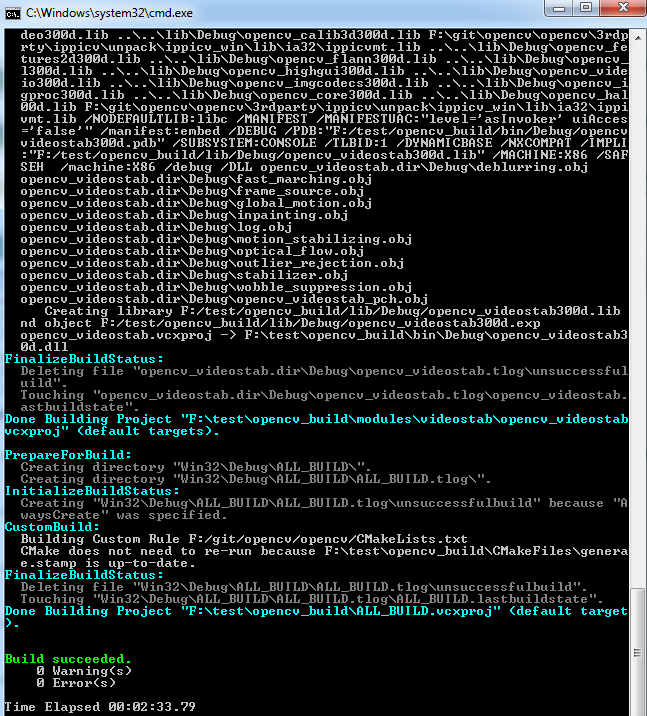
How to Build OpenCV with Command Line Tool
If you prefer building source code with a command line tool, you can learn how to write scripts from opencv\platforms\scripts. Here is the script for building OpenCV source code with default configurations:
set PATH=%PATH%;F:\CMake\bin\

mkdir OpenCVBuild

cd OpenCVBuild

cmake F:\git\opencv\opencv

cmake --build .
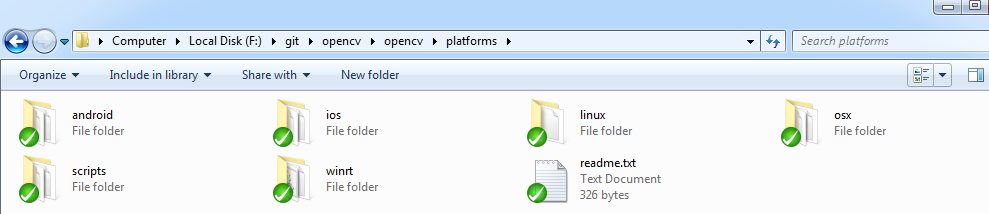
How to Build OpenCV for Android
OpenCV contains toolchains for diverse platforms.
Let’s take Android for example. To build OpenCV for Android on Windows, we need to download ninja. And then we can use following Windows batch scripts:
set PATH=%PATH%;F:\CMake\bin\;F:\zip\ninja-win\

mkdir OpenCV4AndroidBuild

cd OpenCV4AndroidBuild

cmake -GNinja -DCMAKE_TOOLCHAIN_FILE=F:\git\opencv\opencv\platforms\android\android.toolchain.cmake -DANDROID_NDK=F:\android-ndk-r10 -DCMAKE_BUILD_TYPE=Release F:\git\opencv\opencv

cmake --build .
If you are interested in OpenCV, try to build the source code yourself.
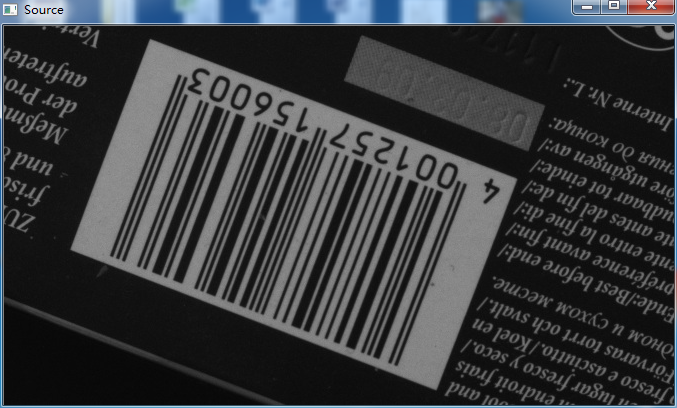
Changes or discontinuities of amplitude attribute, such as luminance value, are fundamentally important primitive characteristics of an image. They often provide an indication of the physical extent of objects. Local Discontinuities of image luminance that from one level to another are called luminance edges. In this post, I’ll share how to make image edge detection with OpenCV.
Overview of Edge Detection
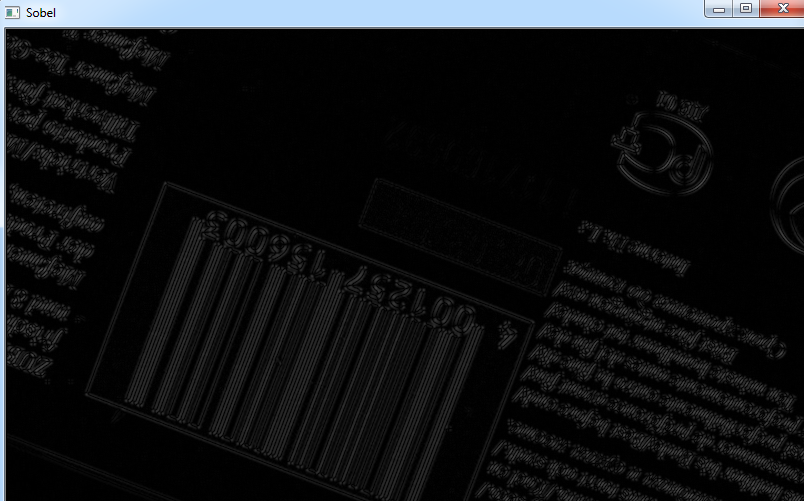
Edge detection is a very common task during image processing. OpenCV provides three most popular edge detection methods: Sobel, Canny, and Laplacian.
The Sobel function prototype is as follows:
CV_EXPORTS_W void Sobel( InputArray src, OutputArray dst, int ddepth,
                         int dx, int dy, int ksize = 3,
                         double scale = 1, double delta = 0,
                         int borderType = BORDER_DEFAULT );
Canny is another famous edge detection algorithm. The function prototype is as follows:
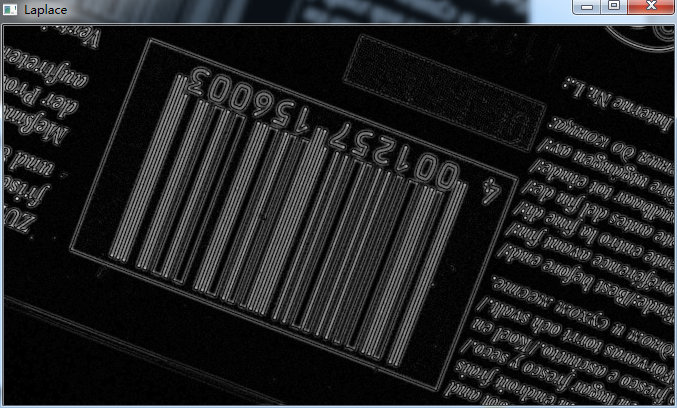
Laplacian is a second-order derivative edge detection technique. The function prototype is as follows:
CV_EXPORTS_W void Laplacian( InputArray src, OutputArray dst, int ddepth,
                             int ksize = 1, double scale = 1, double delta = 0,
                             int borderType = BORDER_DEFAULT );
Building Image Edge Detection Application with Visual Studio 2013
Make sure to prepare your OpenCV environment successfully. If you want to build OpenCV lib by yourself, please refer to blog Building OpenCV with CMake on Windows.
Create a Win32 console project “EdgeDetectionDemo”.
In this tutorial, let’s learn how to use Hough line transformation with OpenCV to make line detection in an Image.
Hough Line Transform
The Hough Line Transform is a transform used to detect straight lines. OpenCV implements three kinds of Hough Line Transforms:(Standard Hough Transform, SHT),(Multi-Scale Hough Transform, MSHT)and (Progressive Probabilistic Hough Transform, PPHT).
Theory
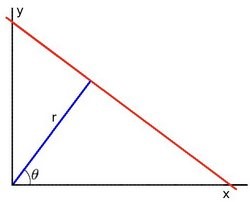
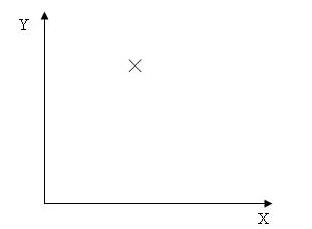
In the Cartesian coordinate system, the line can be expressed as y = mx+b. In general, the straight line can be represented as a point (b, m) in the parameter space.
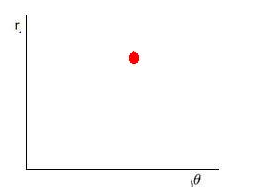
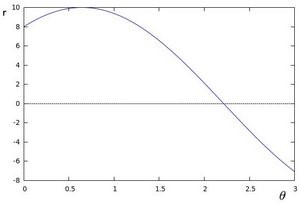
We can express lines in the Polar system. Hence, a line equation can be written as: where r is the length of a normal from the origin to this line and theta is the orientation of r with respect to the X-axis. For each point, we can find a series of lines that goes through that point which means that each pair represents each line that passes by. And for each point, it can be represented as a sinusoid.
It means for each point in X-Y coordinate system can be represented as a sinusoid in the r-theta coordinate system. So all the points can be described as a series of sinusoids. If the curves of two different points intersect in the plane θ - r, that means that both points belong to a same line.
Barcode is an efficient way to make information readable for machines. There are many scenarios of using Barcode reader software. For example, companies use Barcode encoding and decoding software to manage various documents that captured by office scanners. Airport security uses handheld scanners to check the boarding pass and record personal information to the database. Students use the built-in camera of the smartphone to check attendance via Barcode reader software. Since I have a Webcam connected to my desktop PC, I want to empower it to work as a Barcode reader. To implement the solution, I decide to choose OpenCV and Dynamsoft Barcode Reader SDK.
Copy <opencv_installation_dir>\build\python\2.7\x86\cv2.pyd
to <Python27>\Lib\site-packages\cv2.pyd
Create a project folder.
Build Python Barcode library with Dynamsoft Barcode Reader SDK.
Copy Barcode library and all dependencies to the project folder.
Connect a Webcam to your PC. Make sure you have installed the Webcam driver.
Create a Python script to control Webcam, capture images from Webcam and decode images with Python Barcode library.
Creating Python Barcode Library with Dynamsoft Barcode SDK
The first step is to build the Python Barcode library yourself.
#include "Python.h"

#include "If_DBR.h"
#include "BarcodeFormat.h"
#include "BarcodeStructs.h"
#include "ErrorCode.h"

#ifdef _WIN64
#pragma comment(lib, "DBRx64.lib")
#else
#pragma comment(lib, "DBRx86.lib")
#endif

void SetOptions(pReaderOptions pOption, int option_iMaxBarcodesNumPerPage, int option_llBarcodeFormat){

	if (option_llBarcodeFormat > 0)
		pOption->llBarcodeFormat = option_llBarcodeFormat;
	else
		pOption->llBarcodeFormat = OneD;

	if (option_iMaxBarcodesNumPerPage > 0)
		pOption->iMaxBarcodesNumPerPage = option_iMaxBarcodesNumPerPage;
	else
		pOption->iMaxBarcodesNumPerPage = INT_MAX;

}

static PyObject *
initLicense(PyObject *self, PyObject *args)
{
	char *license;

	if (!PyArg_ParseTuple(args, "s", &license)) {
		return NULL;
	}

	printf("information: %s\n", license);

	int ret = DBR_InitLicense(license);

	printf("return value = %d", ret);

	return Py_None;
}

static PyObject *
decodeFile(PyObject *self, PyObject *args)
{
	char *pFileName;
	int option_iMaxBarcodesNumPerPage = -1;
	int option_llBarcodeFormat = -1;

	if (!PyArg_ParseTuple(args, "s", &pFileName)) {
		return NULL;
	}

	pBarcodeResultArray pResults = NULL;
	ReaderOptions option;
	SetOptions(&option, option_iMaxBarcodesNumPerPage, option_llBarcodeFormat);

	int ret = DBR_DecodeFile(
		pFileName,
		&option,
		&pResults
		);

	if (ret == DBR_OK){
		int count = pResults->iBarcodeCount;
		pBarcodeResult* ppBarcodes = pResults->ppBarcodes;
		pBarcodeResult tmp = NULL;

		PyObject* list = PyList_New(count);
		PyObject* result = NULL;

		for (int i = 0; i < count; i++)
		{
			tmp = ppBarcodes[i];
			result = PyString_FromString(tmp->pBarcodeData);

			PyList_SetItem(list, i, Py_BuildValue("iN", (int)tmp->llFormat, result));
		}

		// release memory
		DBR_FreeBarcodeResults(&pResults);

		return list;
	}

	return Py_None;
}

static PyMethodDef methods[] = {
	{ "initLicense", initLicense, METH_VARARGS, NULL },
	{ "decodeFile", decodeFile, METH_VARARGS, NULL },
	{ NULL, NULL }
};

PyMODINIT_FUNC
initDynamsoftBarcodeReader(void)
{
	Py_InitModule("DynamsoftBarcodeReader", methods);
}
For detailed information, please refer to the source code on GitHub. Once the library built successfully, copy DynamsoftBarcodeReader.pyd and DynamsoftBarcodeReaderx64.dll /DynamsoftBarcodeReaderx86.dll to the project folder.
Opening Webcam with OpenCV
Using OpenCV, we can show Webcam preview and capture images with a few lines of Python code.
import cv2.cv as cv

title = "Dynamsoft Barcode Reader"
cv.NamedWindow(title, 1)
capture = cv.CaptureFromCAM(0)

while True:
    img = cv.QueryFrame(capture)
    cv.ShowImage(title, img)
Reading Barcode and Drawing Results over Image
line_type = cv.CV_AA
font = cv.InitFont(cv.CV_FONT_HERSHEY_COMPLEX,
                          0.1, 1, 1, 1, line_type)
fileName = 'test.jpg'
img = cv.QueryFrame(capture)
cv.SaveImage(fileName, img)

results = DynamsoftBarcodeReader.decodeFile(fileName)
top = 30
increase = 20
if results:
    for result in results:
        barcode_format = "Format: " + formats[result[0]]
        barcode_value = "Value: " + result[1]
        cv.PutText(img, barcode_format, (10, top), font, (254, 142, 20))
        top += increase
        cv.PutText(img, barcode_value, (10, top), font, (254, 142, 20))
        top += increase
        cv.PutText(img, "************************", (10, top), font, (254, 142, 20))
        top += increase

cv.ShowImage(title, img)
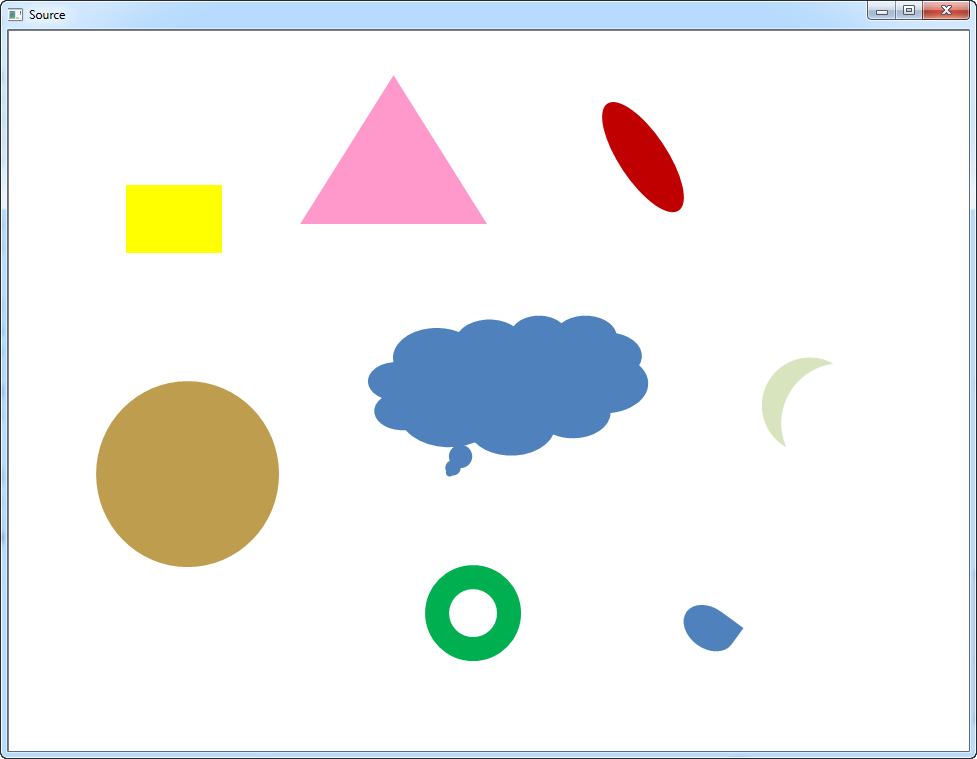
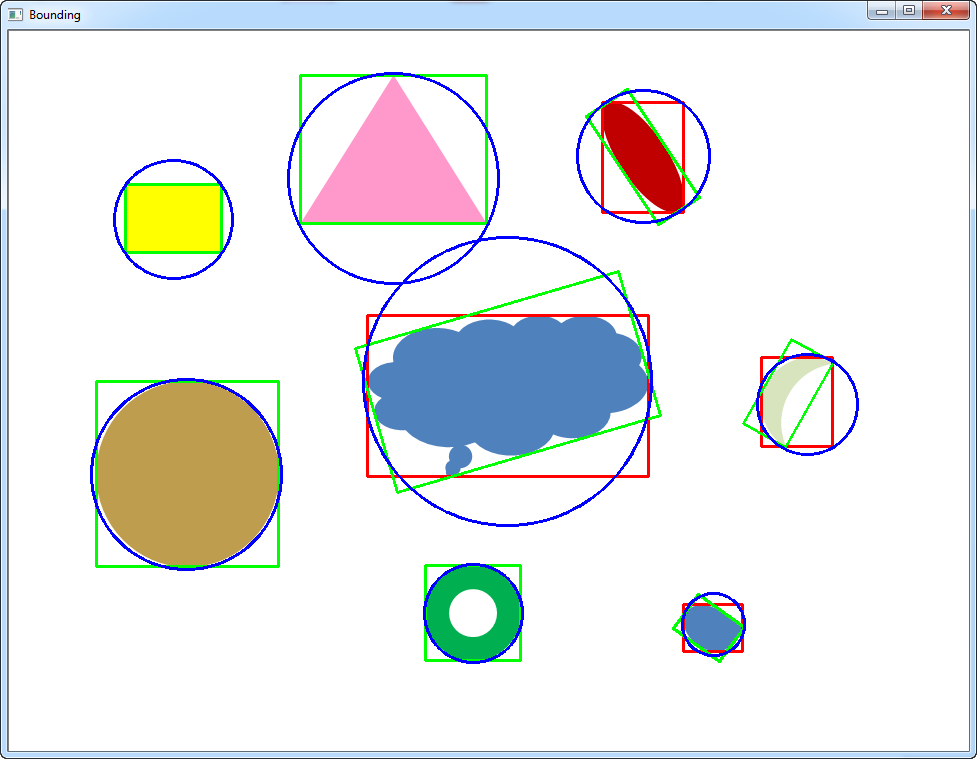
In this tutorial, let’s see how easy to find all contours in an image with OpenCV APIs.
Overview
Finding contours is a useful task during image processing. The relevant OpenCV functions are as follows:
Find contours in a binary image.
void findContours(InputOutputArray image, OutputArrayOfArrays contours, OutputArray hierarchy, int mode, int method, Point offset=Point())
Draw contour outlines or fill contours.
void drawContours(InputOutputArray image, InputArrayOfArrays contours, int contourIdx, const Scalar& color, int thickness=1, int lineType=8, InputArray hierarchy=noArray(), int maxLevel=INT_MAX, Point offset=Point() )
Calculates the upright bounding rectangle of a point set.
Rect boundingRect(InputArray points)
Find a rotated rectangle of the minimum area enclosing the input 2D point set.
RotatedRect minAreaRect(InputArray points)
Find a circle of the minimum area enclosing a 2D point set.
void minEnclosingCircle(InputArray points, Point2f& center, float& radius)
Building Contour Demo with Visual Studio 2013
Make sure to prepare your OpenCV environment successfully. If you want to make OpenCV library by yourself, please refer to blog Building OpenCV with CMake on Windows.
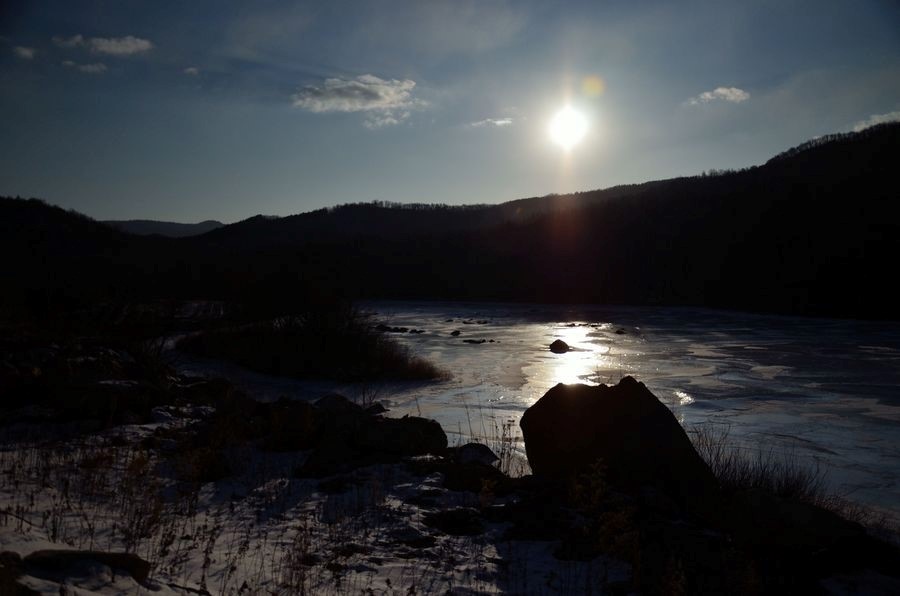
In reality, we can always see some photos that have low brightnesses and low contrast. To make objects recognizable in pictures, we need to process the photo with Illumination Compensation. There are many algorithms used for Illumination Compensation such as Histogram equalization, Color similarity measure, Gamma Correction and so on. In this tutorial, I will introduce Gamma Correction and show you how to use it with OpenCV.
What is Gamma Correction
Gamma correction was originally designed to compensate for CRT monitors’ non-linear response to the input signal. CRTs were not able to amplify the input signal themselves and thus the output signal from the PC needed to be adjusted, giving rise to (as of today) standard gamma 2.2 correction and sRGB color space. Gamma Correction is the name of a nonlinear operation used to code and decode luminance or tristimulus values in video or still image systems. Here is the definition of Gamma Correction in Wikipedia:
“Gamma correction is, in the simplest cases, defined by the following power-law expression:
where A is a constant and the input and output values are non-negative real values; in the common case of A = 1, inputs and outputs are typically in the range 0–1. A gamma value γ < 1 is sometimes called an encoding gamma, and the process of encoding with this compressive power-law nonlinearity is called gamma compression; conversely a gamma value γ > 1 is called a decoding gamma and the application of the expansive power-law nonlinearity is called gamma expansion.”
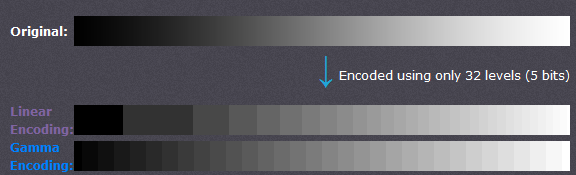
Gamma encoded images store tones more efficiently. Since gamma encoding redistributes tonal levels closer to how our eyes perceive them, fewer bits are needed to describe a given tonal range. Otherwise, an excess of bits would be devoted to describing the brighter tones (where the camera is relatively more sensitive), and a shortage of bits would be left to describe the darker tones (where the camera is relatively less sensitive):
If an image is under or over gamma corrected, this also affects the color balance. Over correction (in addition to making mid-tones too light) shifts colors towards neutral grey, while under correction (in addition to making mid-tones too dark) shifts colors towards the display primaries.
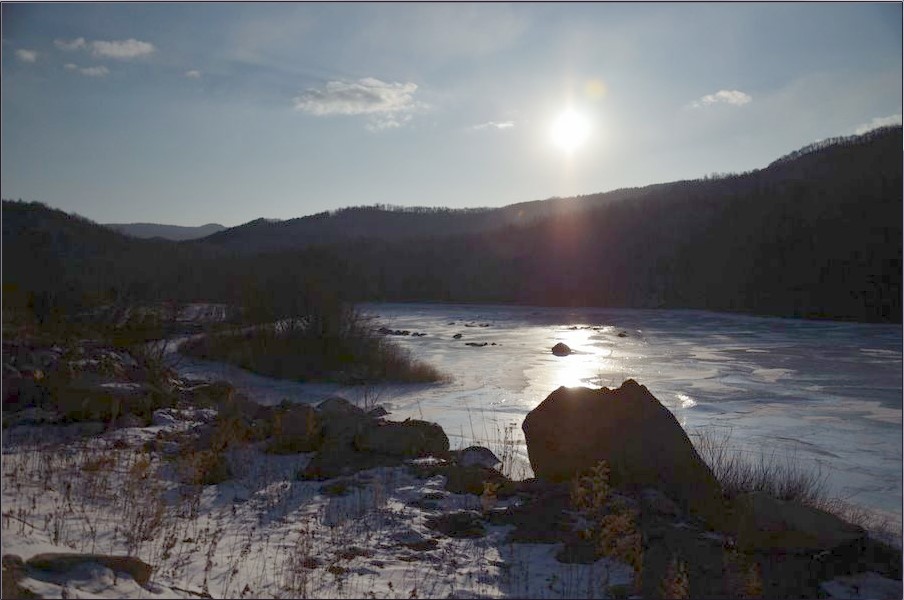
We can see when the image has low brightnesses and low contrast, we can process it by Gamma Correction, and the value of gamma should be less than 1.Because the algorithm can expand low gray steps and compress the high gray steps when γ < 1.
How to Use Gamma Correction with OpenCV
Gamma correction controls the overall brightness of an image. Images that are not corrected can look either bleached out or too dark. We can use this case:
R = pow(R, 1/Gamma)

G = pow(G, 1/Gamma)

B = pow(B, 1/Gamma)
The algorithm can be implemented with the following code, which can process images that have one or three channels.
void GammaCorrection(Mat& src, Mat& dst, float fGamma)

{

unsigned char lut[256];

for (int i = 0; i < 256; i++)

{

lut[i] = saturate_cast<uchar>(pow((float)(i / 255.0), fGamma) * 255.0f);

}

dst = src.clone();

const int channels = dst.channels();

switch (channels)

{

case 1:

{

MatIterator_<uchar> it, end;

for (it = dst.begin<uchar>(), end = dst.end<uchar>(); it != end; it++)

*it = lut[(*it)];

break;

}

case 3:

{

MatIterator_<Vec3b> it, end;

for (it = dst.begin<Vec3b>(), end = dst.end<Vec3b>(); it != end; it++)

{

(*it)[0] = lut[((*it)[0])];

(*it)[1] = lut[((*it)[1])];

(*it)[2] = lut[((*it)[2])];

}

break;

}

}

}
Dynamsoft Barcode Reader C++ SDK is available for Windows, Linux, and Mac (iOS and Android editions are coming soon). I have shared an article that illustrates how to build webcam barcode reader in Python. In this tutorial, I’ll use a different C++ API to implement barcode scanner applications for Windows and Raspberry Pi with a webcam.
       VideoCapture cap(0);
       if (!cap.isOpened())
              return -1;
       Mat frame;
       for (;;)
       {
              cap >> frame; // Get a new frame from camera
              imshow(windowName, frame); // Display the new frame
              if (waitKey(30) >= 0)
                     break;
       }
Porting the source code from Windows to Linux is a little bit tricky because DIB structure is not defined on Linux platform. We can define it ourselves:
typedef unsigned long       DWORD;
typedef long LONG;
typedef unsigned short      WORD;

typedef struct tagBITMAPINFOHEADER {
      DWORD biSize;
        LONG  biWidth;
          LONG  biHeight;
            WORD  biPlanes;
              WORD  biBitCount;
                DWORD biCompression;
                  DWORD biSizeImage;
                    LONG  biXPelsPerMeter;
                      LONG  biYPelsPerMeter;
                        DWORD biClrUsed;
                          DWORD biClrImportant;

} BITMAPINFOHEADER;
OpenCV officially provides both C++ and Python APIs for developers. Most of the time, developers just need to use one kind of programming languages to read, write and process images with hundreds of computer vision algorithms. However, if you want to use OpenCV Python APIs with an extended C/C++ library, it will be tricky to pass the data. In this article, I will share how to read camera stream with OpenCV-Python and detect barcode with Dynamsoft C/C++ Barcode SDK.
How to get the C/C++ pointer that pointing to numpy.ndarray?
According to the OpenCV source file opencv\modules\python\src2\cv2.cv.hpp, we can use the following code to get the memory address of the data in C:
    PyObject *o;
    if (!PyArg_ParseTuple(args, "O", &o))
        return NULL;

    PyObject *ao = PyObject_GetAttrString(o, "__array_struct__");
    PyObject *retval;

    if ((ao == NULL) || !PyCObject_Check(ao)) {
        PyErr_SetString(PyExc_TypeError, "object does not have array interface");
        return NULL;
    }

    PyArrayInterface *pai = (PyArrayInterface*)PyCObject_AsVoidPtr(ao);
    if (pai->two != 2) {
        PyErr_SetString(PyExc_TypeError, "object does not have array interface");
        Py_DECREF(ao);
        return NULL;
    }

    // Construct data with header info and image data
    char *buffer = (char*)pai->data; // The address of image data
    int width = pai->shape[1];       // image width
    int height = pai->shape[0];      // image height
    int size = pai->strides[0] * pai->shape[0]; // image size = stride * height
How to use the barcode detection API?
You can’t just pass the data pointer directly to DBR_DecodeBuffer(). The data needs to be reconstructed with some extra information:
    char *total = (char *)malloc(size + 40); // buffer size = image size + header size
    memset(total, 0, size + 40);
    BITMAPINFOHEADER bitmap_info = {40, width, height, 0, 24, 0, size, 0, 0, 0, 0};
    memcpy(total, &bitmap_info, 40);

    // Copy image data to buffer from bottom to top
    char *data = total + 40;
    int stride = pai->strides[0];
    for (int i = 1; i <= height; i++) {
        memcpy(data, buffer + stride * (height - i), stride);
        data += stride;
    }
Read barcode from images and return results:
// Dynamsoft Barcode Reader initialization
    __int64 llFormat = (OneD | QR_CODE | PDF417 | DATAMATRIX);
    int iMaxCount = 0x7FFFFFFF;
    ReaderOptions ro = {0};
    pBarcodeResultArray pResults = NULL;
    ro.llBarcodeFormat = llFormat;
    ro.iMaxBarcodesNumPerPage = iMaxCount;
    printf("width: %d, height: %d, size:%d\n", width, height, size);
    int iRet = DBR_DecodeBuffer((unsigned char *)total, size + 40, &ro, &pResults);
    printf("DBR_DecodeBuffer ret: %d\n", iRet);
    free(total); // Do not forget to release the constructed buffer

    // Get results
    int count = pResults->iBarcodeCount;
    pBarcodeResult* ppBarcodes = pResults->ppBarcodes;
    pBarcodeResult tmp = NULL;
    retval = PyList_New(count); // The returned Python object
    PyObject* result = NULL;
    for (int i = 0; i < count; i++)
    {
        tmp = ppBarcodes[i];
        result = PyString_FromString(tmp->pBarcodeData);
        printf("result: %s\n", tmp->pBarcodeData);
        PyList_SetItem(retval, i, Py_BuildValue("iN", (int)tmp->llFormat, result)); // Add results to list
    }
    // release memory
    DBR_FreeBarcodeResults(&pResults);
What if you see the error ‘Unable to find vcvarsall.bat’ when building Python extension on Windows?
According to the answer from StackOverflow, execute the following command based on the version of Visual Studio installed:
Visual Studio 2010 (VS10): SET VS90COMNTOOLS=%VS100COMNTOOLS%
Visual Studio 2012 (VS11): SET VS90COMNTOOLS=%VS110COMNTOOLS%
Visual Studio 2013 (VS12): SET VS90COMNTOOLS=%VS120COMNTOOLS%
Visual Studio 2015 (VS14): SET VS90COMNTOOLS=%VS140COMNTOOLS%
I’m using Visual Studio 2015, and thus I can build Python extension as follows:
SET VS90COMNTOOLS=%VS140COMNTOOLS%
python setup.py build install
Python Script for Testing
Open camera:
import cv2
from dbr import *
import time

vc = cv2.VideoCapture(0)
Previously, I wrote an article Raspberry Pi Barcode Scanner with Webcam and Python illustrating how to build a simple barcode scanner using Dynamsoft Barcode Reader SDK and OpenCV from scratch. The method decodeFile() was used for detecting barcodes from an image file. To use the API, you have to firstly write image buffer that obtained by OpenCV API to a file. Because the I/O operation takes too much time, this API is not good for real-time barcode detection from webcam video stream. Considering this scenario, I have added a new Python API decodeBuffer(). In this article, I will illustrate how to create and use the new API.
Because the source code is transplanted from Windows edition, we have to define following types and structure:
typedef unsigned long DWORD;
typedef long LONG;
typedef unsigned short WORD;

typedef struct tagBITMAPINFOHEADER {
  DWORD biSize;
  LONG biWidth;
  LONG biHeight;
  WORD biPlanes;
  WORD biBitCount;
  DWORD biCompression;
  DWORD biSizeImage;
  LONG biXPelsPerMeter;
  LONG biYPelsPerMeter;
  DWORD biClrUsed;
  DWORD biClrImportant;
} BITMAPINFOHEADER;
Convert the numpy data from Python to C in decodeBuffer(). Besides that, we have to construct a native buffer for barcode reading:
#include <ndarraytypes.h>

static PyObject *
decodeBuffer(PyObject *self, PyObject *args)
{
    PyObject *o;
    if (!PyArg_ParseTuple(args, "O", &o))
        return NULL;

    PyObject *ao = PyObject_GetAttrString(o, "__array_struct__");
    PyObject *retval;

    if ((ao == NULL) || !PyCObject_Check(ao)) {
        PyErr_SetString(PyExc_TypeError, "object does not have array interface");
        return NULL;
    }

    PyArrayInterface *pai = (PyArrayInterface*)PyCObject_AsVoidPtr(ao);
    if (pai->two != 2) {
        PyErr_SetString(PyExc_TypeError, "object does not have array interface");
        Py_DECREF(ao);
        return NULL;
    }

    // Construct data with header info and image data
    char *buffer = (char*)pai->data; // The address of image data
    int width = pai->shape[1];       // image width
    int height = pai->shape[0];      // image height
    int size = pai->strides[0] * pai->shape[0]; // image size = stride * height
    char *total = (char *)malloc(size + 40); // buffer size = image size + header size
    memset(total, 0, size + 40);
    BITMAPINFOHEADER bitmap_info = {40, width, height, 0, 24, 0, size, 0, 0, 0, 0};
    memcpy(total, &bitmap_info, 40);

    // Copy image data to buffer from bottom to top
    char *data = total + 40;
    int stride = pai->strides[0];
    int i = 1;
    for (; i <= height; i++) {
        memcpy(data, buffer + stride * (height - i), stride);
        data += stride;
    }

    // Dynamsoft Barcode Reader initialization
    __int64 llFormat = (OneD | QR_CODE | PDF417 | DATAMATRIX);
    int iMaxCount = 0x7FFFFFFF;
    ReaderOptions ro = {0};
    pBarcodeResultArray pResults = NULL;
    ro.llBarcodeFormat = llFormat;
    ro.iMaxBarcodesNumPerPage = iMaxCount;
    printf("width: %d, height: %d, size:%d\n", width, height, size);
    int iRet = DBR_DecodeBuffer((unsigned char *)total, size + 40, &ro, &pResults);
    printf("DBR_DecodeBuffer ret: %d\n", iRet);
    free(total); // Do not forget to release the constructed buffer

    // Get results
    int count = pResults->iBarcodeCount;
    pBarcodeResult* ppBarcodes = pResults->ppBarcodes;
    pBarcodeResult tmp = NULL;
    retval = PyList_New(count); // The returned Python object
    PyObject* result = NULL;
    i = 0;
    for (; i < count; i++)
    {
        tmp = ppBarcodes[i];
        result = PyString_FromString(tmp->pBarcodeData);
        printf("result: %s\n", tmp->pBarcodeData);
        PyList_SetItem(retval, i, Py_BuildValue("iN", (int)tmp->llFormat, result)); // Add results to list
    }
    // release memory
    DBR_FreeBarcodeResults(&pResults);

    Py_DECREF(ao);
    return retval;
}
Raspberry Pi Barcode Scanner
How to set video frame rate, frame width, and frame height?
The next step is to install Python and NumPy. Python is pre-installed on macOS. The default version is not compatible with the latest OpenCV. Therefore, you need to install the latest Python using Homebrew.
Get native image data that decoded by OpenCV Python API:
    PyObject *o;
    if (!PyArg_ParseTuple(args, "O", &o))
        return NULL;

    PyObject *ao = PyObject_GetAttrString(o, "__array_struct__");
    PyObject *retval;

    if ((ao == NULL) || !PyCObject_Check(ao)) {
        PyErr_SetString(PyExc_TypeError, "object does not have array interface");
        return NULL;
    }

    PyArrayInterface *pai = (PyArrayInterface*)PyCObject_AsVoidPtr(ao);
    if (pai->two != 2) {
        PyErr_SetString(PyExc_TypeError, "object does not have array interface");
        Py_DECREF(ao);
        return NULL;
    }

    char *buffer = (char*)pai->data; // The address of image data
    int width = pai->shape[1];       // image width
    int height = pai->shape[0];      // image height
    int size = pai->strides[0] * pai->shape[0]; // image size = stride * height
Define BITMAPINFOHEADER structure. The DWORD defined by Microsoft is unsigned long, but here it is unsigned int. The size of the type should be 4 bytes.
typedef unsigned int DWORD;
typedef int LONG;
typedef unsigned short WORD;

#pragma pack(push)
#pragma pack(1)

typedef struct tagBITMAPINFOHEADER {
  DWORD biSize;
  LONG biWidth;
  LONG biHeight;
  WORD biPlanes;
  WORD biBitCount;
  DWORD biCompression;
  DWORD biSizeImage;
  LONG biXPelsPerMeter;
  LONG biYPelsPerMeter;
  DWORD biClrUsed;
  DWORD biClrImportant;
} BITMAPINFOHEADER;

#pragma pack(pop)
Construct a buffer with bitmap header info for barcode detection.
int dib_header_size = sizeof(BITMAPINFOHEADER);

char *total = (char *)malloc(size + dib_header_size); // buffer size = image size + header size
memset(total, 0, size + dib_header_size);
BITMAPINFOHEADER bitmap_info = {dib_header_size, width, height, 0, 24, 0, size, 0, 0, 0, 0};
memcpy(total, &bitmap_info, dib_header_size);

// Copy image data to buffer from bottom to top
char *data = total + dib_header_size;
int stride = pai->strides[0];
int i = 1;
for (; i <= height; i++) {
    memcpy(data, buffer + stride * (height - i), stride);
    data += stride;
}
int iRet = DBR_DecodeBuffer((unsigned char *)total, size + dib_header_size, &ro, &pResults);
Get and return barcode results:
    int count = pResults->iBarcodeCount;
    pBarcodeResult* ppBarcodes = pResults->ppBarcodes;
    pBarcodeResult tmp = NULL;
    retval = PyList_New(count); // The returned Python object
    PyObject* result = NULL;
    i = 0;
    for (; i < count; i++)
    {
        tmp = ppBarcodes[i];
        result = PyString_FromString(tmp->pBarcodeData);
        printf("result: %s\n", tmp->pBarcodeData);
        PyList_SetItem(retval, i, Py_BuildValue("iN", (int)tmp->llFormat, result)); // Add results to list
    }
    // release memory
    DBR_FreeBarcodeResults(&pResults);
Using OpenCV APIs to capture video from a camera is convenient. However, OpenCV does not provide an API for listing all available devices. If you have multiple cameras connected to your PC, you have no idea how to choose the right one. To get device information on Windows, you need to invoke DirectShow APIs. In this post, I will share how to create a Python extension that lists camera devices for OpenCV-Python on Windows.
Bridging DirectShow APIs to OpenCV-Python
How to run DirectShow sample
To use DirectShow APIs, read the Microsoft’s tutorial – Selecting a Capture Device, which shares how to list video and audio devices in C++.
To run the sample, create an empty Win32 Console Application in Visual Studio: File > New > Project > Templates > Visual C++ > Win32.
Create main.cpp, and copy all codes snippets from the tutorial page to the C++ file.
Build and run the project.
How to wrap up DirectShow C++ code
Define Python module and change main() function to a Python method:
Note: you have to convert BSTR to string. To use ConvertBSTRToString, we need a header file #include <comutil.h>, and the corresponding library #pragma comment(lib, “comsuppw.lib”).
How to build and use Python extension
Create setup.py:
from distutils.core import setup, Extension

module_device = Extension('device',
                        sources = ['device.cpp'],
                        library_dirs=['G:\Program Files\Microsoft SDKs\Windows\v6.1\Lib']
                      )

setup (name = 'WindowsDevices',
        version = '1.0',
        description = 'Get device list with DirectShow',
        ext_modules = [module_device])
Build and install the extension:
python setup.py build install
If you see the error ‘Unable to find vcvarsall.bat’, set Visual Studio environment:
Visual Studio 2010 (VS10): SET VS90COMNTOOLS=%VS100COMNTOOLS%
Visual Studio 2012 (VS11): SET VS90COMNTOOLS=%VS110COMNTOOLS%
Visual Studio 2013 (VS12): SET VS90COMNTOOLS=%VS120COMNTOOLS%
Visual Studio 2015 (VS14): SET VS90COMNTOOLS=%VS140COMNTOOLS%
Create test.py to use the extension for OpenCV-Python:
import device
import cv2

def select_camera(last_index):
    number = 0
    hint = "Select a camera (0 to " + str(last_index) + "): "
    try:
        number = int(input(hint))
        # select = int(select)
    except Exception ,e:
        print("It's not a number!")
        return select_camera(last_index)

    if number > last_index:
        print("Invalid number! Retry!")
        return select_camera(last_index)

    return number


def open_camera(index):
    cap = cv2.VideoCapture(index)
    return cap

def main():
    # print OpenCV version
    print("OpenCV version: " + cv2.__version__)

    # Get camera list
    device_list = device.getDeviceList()
    index = 0

    for name in device_list:
        print(str(index) + ': ' + name)
        index += 1

    last_index = index - 1

    if last_index < 0:
        print("No device is connected")
        return

    # Select a camera
    camera_number = select_camera(last_index)

    # Open camera
    cap = open_camera(camera_number)

    if cap.isOpened():
        width = cap.get(3) # Frame Width
        height = cap.get(4) # Frame Height
        print('Default width: ' + str(width) + ', height: ' + str(height))

        while True:

            ret, frame = cap.read();
            cv2.imshow("frame", frame)

            # key: 'ESC'
            key = cv2.waitKey(20)
            if key == 27:
                break

        cap.release()
        cv2.destroyAllWindows()

if __name__ == "__main__":
    main()
Recently, I was inspired by a blog post “Python Live Video Streaming Example” and thinking whether it is possible to save the camera streaming to a video file. Based on the example code, I managed to figure out a solution. In this post, I want to share the process of building the web camera recorder using OpenCV and Flask.
How to Use OpenCV to Record a Video
Let’s start with the code snippet posted on OpenCV website:
import numpy as np
import cv2

cap = cv2.VideoCapture(0)

# Define the codec and create VideoWriter object
fourcc = cv2.VideoWriter_fourcc(*'XVID')
out = cv2.VideoWriter('output.avi',fourcc, 20.0, (640,480))

while(cap.isOpened()):

    ret, frame = cap.read()
    if ret==True:
        frame = cv2.flip(frame,0)
        # write the flipped frame
        out.write(frame)
        cv2.imshow('frame',frame)

        if cv2.waitKey(1) & 0xFF == ord('q'):
            break
    else:
        break

# Release everything if job is finished
cap.release()
out.release()
cv2.destroyAllWindows()
After running the code on Windows, I got a 0KB file. The reason is the codec does not exist in my Windows 10. Replace fourcc with -1 to check the available codec list:
out = cv2.VideoWriter('output.avi', -1, 20.0, (640,480))
Instead of XVID, using MJPG will work.
fourcc = cv2.VideoWriter_fourcc(*'MJPG')
MJPG codec results in high size video. To get a smaller size, we need to install X264, which is not in the codec list by default.
Change codec to X264:
fourcc = cv2.VideoWriter_fourcc(*'X264')
Once you run the app, an annoying log window will pop up:
I have found the solution here. Open Windows registry and set log_level value 0.
How to Build Camera Recorder in Web Browser
The source code of video_streaming_with_flask_example is good but limited. It keeps sending responses that contain image data and never ends.
def get_frame(self):
        success, image = self.video.read()
        # We are using Motion JPEG, but OpenCV defaults to capture raw images,
        # so we must encode it into JPEG in order to correctly display the
        # video stream.
        ret, jpeg = cv2.imencode('.jpg', image)
        return jpeg.tobytes()
In this case, the web browser cannot load other resources and execute JavaScript code. To avoid this situation, I removed the loop: an image request only receives one frame.
def video_stream():
    global video_camera
    global global_frame

    if video_camera == None:
        video_camera = VideoCamera()

    frame = video_camera.get_frame()

    if frame != None:
        global_frame = frame
        yield (b'--frame\r\n'
                b'Content-Type: image/jpeg\r\n\r\n' + frame + b'\r\n\r\n')
    else:
        yield (b'--frame\r\n'
                        b'Content-Type: image/jpeg\r\n\r\n' + global_frame + b'\r\n\r\n')
To make the static image looks like a video, use setInterval() to grab images from server continuously:
function playVideo() {
    var video = document.getElementById("video");
    video.src = "/video_viewer?" + new Date().getTime();
}

setInterval(playVideo, 30);
Use XMLHttpRequest to start and stop video recording event.
Client:
    var xhr = new XMLHttpRequest();
    xhr.onreadystatechange = function() {
        if (xhr.readyState == 4 && xhr.status == 200) {
            // alert(xhr.responseText);
        }
    }
    xhr.open("POST", "/record_status");
    xhr.setRequestHeader("Content-Type", "application/json;charset=UTF-8");
    xhr.send(JSON.stringify({ status: "true" }));
Server:
@app.route('/record_status', methods=['POST'])
def record_status():
    global video_camera
    if video_camera == None:
        video_camera = VideoCamera()

    json = request.get_json()

    status = json['status']

    if status == "true":
        video_camera.start_record()
        return jsonify(result="started")
    else:
        video_camera.stop_record()
        return jsonify(result="stopped")
Every time the event is triggered, create a new thread to save camera stream to a video file.
class RecordingThread (threading.Thread):
    def __init__(self, name, camera):
        threading.Thread.__init__(self)
        self.name = name
        self.isRunning = True

        self.cap = camera
        fourcc = cv2.VideoWriter_fourcc(*'MJPG')
        self.out = cv2.VideoWriter('./static/video.avi',fourcc, 20.0, (640,480))

    def run(self):
        while self.isRunning:
            ret, frame = self.cap.read()
            if ret:
                self.out.write(frame)

        self.out.release()

    def stop(self):
        self.isRunning = False

    def __del__(self):
        self.out.release()
Many excellent document mobile apps support not only image capture, but also edge detection and perspective transformation. If you are interested in these computer vision technologies, you can use OpenCV to create a free document scanner app yourself. In this post, I want to share how to use OpenCV-Python to create a web document scanner step by step.
Create document.py to do edge detection and perspective transformation:
import cv2
import rect
import numpy as np

class Scanner(object):
    # http://www.pyimagesearch.com/2014/08/25/4-point-opencv-getperspective-transform-example/
    def four_point_transform(self, image, rect):
    	# obtain a consistent order of the points and unpack them
        # individually
        (tl, tr, br, bl) = rect

        # compute the width of the new image, which will be the
        # maximum distance between bottom-right and bottom-left
        # x-coordiates or the top-right and top-left x-coordinates
        widthA = np.sqrt(((br[0] - bl[0]) ** 2) + ((br[1] - bl[1]) ** 2))
        widthB = np.sqrt(((tr[0] - tl[0]) ** 2) + ((tr[1] - tl[1]) ** 2))
        maxWidth = max(int(widthA), int(widthB))

        # compute the height of the new image, which will be the
        # maximum distance between the top-right and bottom-right
        # y-coordinates or the top-left and bottom-left y-coordinates
        heightA = np.sqrt(((tr[0] - br[0]) ** 2) + ((tr[1] - br[1]) ** 2))
        heightB = np.sqrt(((tl[0] - bl[0]) ** 2) + ((tl[1] - bl[1]) ** 2))
        maxHeight = max(int(heightA), int(heightB))

        # now that we have the dimensions of the new image, construct
        # the set of destination points to obtain a "birds eye view",
        # (i.e. top-down view) of the image, again specifying points
        # in the top-left, top-right, bottom-right, and bottom-left
        # order
        dst = np.array([
            [0, 0],
            [maxWidth - 1, 0],
            [maxWidth - 1, maxHeight - 1],
            [0, maxHeight - 1]], dtype = "float32")

        # compute the perspective transform matrix and then apply it
        M = cv2.getPerspectiveTransform(rect, dst)
        warped = cv2.warpPerspective(image, M, (maxWidth, maxHeight))

        # return the warped image
        return warped

    # https://github.com/vipul-sharma20/document-scanner
    def detect_edge(self, image, enabled_transform = False):
        dst = None
        orig = image.copy()

        gray = cv2.cvtColor(image, cv2.COLOR_BGR2GRAY)
        blurred = cv2.GaussianBlur(gray, (5, 5), 0)
        edged = cv2.Canny(blurred, 0, 20)
        _, contours, _ = cv2.findContours(edged, cv2.RETR_LIST, cv2.CHAIN_APPROX_NONE)

        contours = sorted(contours, key=cv2.contourArea, reverse=True)

        for cnt in contours:
            epsilon = 0.051 * cv2.arcLength(cnt, True)
            approx = cv2.approxPolyDP(cnt, epsilon, True)

            if len(approx) == 4:
                target = approx
                cv2.drawContours(image, [target], -1, (0, 255, 0), 2)

                if enabled_transform:
                    approx = rect.rectify(target)
                    # pts2 = np.float32([[0,0],[800,0],[800,800],[0,800]])
                    # M = cv2.getPerspectiveTransform(approx,pts2)
                    # dst = cv2.warpPerspective(orig,M,(800,800))
                    dst = self.four_point_transform(orig, approx)
                break

        return image, dst
Document Scanning is nothing new for mobile apps. I remember the first time that I installed a document scanning app was in 2010. However, Apple, Microsoft, and Google the giant tech companies got started to recognize the importance of document scanning technology recently. It is good to see the function appears in iOS Notes, Office Lens and Google Drive. Why is the document scanning being hot now? I think the reason is the quality of images captured by mobile cameras is getting better and better. More and more users tend to scan documents with cameras instead of traditional scanners. If you are not familiar with Android and iOS development, you can use HTML5. In this post, I will share how to create a simple web document management app using OpenCV.js.
How to Use FileSystem APIs to Write, Read and Remove Images
While creating a web client-side document management app, if you keep all image data in memory, you will see the “out of memory” warning soon. To avoid the issue, we can write memory data to cache. There are several storage options available in HTML5, such as Local Storage, Session Storage, IndexedDB, Web SQL, and Cookies. Due to the size limitation, they are not suitable for my scenario. My use case is to load and edit images that are large binary blobs in the web browser. It is why I need to use FileSystem APIs which aims to deal with data outside of the context of the browser.
Load an image to memory
Create an input element and set “file” as the type. The following code can change the button text:
Comparing to desktop platforms, the “file” type running on mobile platforms trigger not only a file selection window but also the default camera app.
Use FileReader to load an image into an array buffer and wrap it as a blob.
fileReader.onload = function (event) {
    if (!cacheManager.hasStorage(event.target.result.byteLength)) {
      alert('Image storage is full. Please clear some images to get storage quota.');
      return;
    }
    let size = event.target.result.byteLength / 1024;
    log('size = ' + size + 'K');

    var arrayBufferView = new Uint8Array(this.result);
    var blob = new Blob([arrayBufferView], {
      type: "image/png"
    });

    renderBlobImage(blob, 'canvas');

  };
  fileReader.readAsArrayBuffer(file);
Draw the image on a canvas:
function renderBlobImage(blob, canvasID) {
  var urlCreator = window.URL || window.webkitURL;

  let canvas = document.getElementById(canvasID);
  let ctx = canvas.getContext('2d');
  var image = new Image();
  image.onload = function () {
    ctx.clearRect(0, 0, canvas.width, canvas.height);
    var canvasWidth = 600;
    var canvasHeight = 400;

    var scaleFactor = Math.min((canvasWidth / image.width), (canvasHeight / image.height));
    canvas.width = image.width * scaleFactor;
    canvas.height = image.height * scaleFactor;
    ctx.drawImage(image, 0, 0, image.width * scaleFactor, image.height * scaleFactor);
  }
  image.src = urlCreator.createObjectURL(blob);
}
Why do we need to use createWriter() twice? The first createWriter() is used to clear the existing data.
We can compare the storage usage before and after:
Before
After
Read a file
CacheManager.prototype.readFile = function (fileName, callback) {
    function onInitFs(fs) {
      fs.root.getFile(
        fileName, {},
        function (fileEntry) {

          // Get a File object representing the file,
          // then use FileReader to read its contents.
          fileEntry.file(callback, errorHandler);

        },
        errorHandler);
    }

    window.requestFileSystem(
      window.TEMPORARY, this.storageSize, onInitFs, errorHandler);
  };
OpenCV.js is a JavaScript binding that exposes OpenCV library to the web.
To use OpenCV.js, you just need to include cv.js:
<script async src="cv.js"></script>
When opening your web page, OpenCV.js will load the cv.data file via XMLHttpRequest. Here is the code snippet that I extracted from the complex sample code for monitoring the download status:
var Module = {
  setStatus: function (text) {
    if (!Module.setStatus.last) Module.setStatus.last = {
      time: Date.now(),
      text: ''
    };
    if (text === Module.setStatus.text) return;
    var m = text.match(/([^(]+)\((\d+(\.\d+)?)\/(\d+)\)/);
    var now = Date.now();
    if (m && now - Date.now() < 30) return; // if this is a progress update, skip it if too soon
    if (m) {
      text = m[1];

    }
    if (text === '') {
      isOpenCVReady = true;
      console.log('OpenCV is ready');
      // onPreprocess();
    }

  },
  totalDependencies: 0,
  monitorRunDependencies: function (left) {
    this.totalDependencies = Math.max(this.totalDependencies, left);
    Module.setStatus(left ? 'Preparing... (' + (this.totalDependencies - left) + '/' + this.totalDependencies + ')' : 'All downloads complete.');
  }
};
Module.setStatus('Downloading...');
Once OpenCV context is ready, we can call any OpenCV methods in JavaScript. However, there seems to be a bug:
I debugged line by line and finally focused on the following code:
OpenCV is written in C++. If you install OpenCV library on Windows, you will see OpenCV officially provides wrappers for Python and Java but not for C#. Fortunately, there are many .NET open source projects for wrapping OpenCV C++ APIs, and thus we don’t need to write a wrapper from scratch. In this post, I will share how to use OpenCV library and Dynamsoft Barcode Reader SDK to create a .NET barcode reader app on Windows.
int key = Cv2.WaitKey(20);
// 'ESC'
if (key == 27)
{
    break;
}
Create a barcode reader object:
BarcodeReader reader = new BarcodeReader("t0068MgAAALLyUZ5pborJ8XVc3efbf4XdSvDAVUonA4Z3/FiYqz1MOHaUJD3d/uBmEtXVCn9fw9WIlNw6sRT/DepkdvVW4fs=");
To recognize barcodes, you can use DecodeBuffer() function. However, the type of the first parameter is byte[]. Now the biggest problem is how we can make the function work with Mat type.
Get the data pointer, width, height and element size as follows:
IntPtr data = image.Data;
int width = image.Width;
int height = image.Height;
int elemSize = image.ElemSize();
int buffer_size = width * height * elemSize;
Copy the data to a byte array:
using System.Runtime.InteropServices;
byte[] buffer = new byte[buffer_size];
Marshal.Copy(data, buffer, 0, buffer_size);
Decode the buffer and return barcode results:
BarcodeResult[] results = reader.DecodeBuffer(buffer, width, height, width * elemSize, ImagePixelFormat.IPF_RGB_888);
if (results != null)
{
    Console.WriteLine("Total result count: " + results.Length);
    foreach (BarcodeResult result in results)
    {
        Console.WriteLine(result.BarcodeText);
    }
}
A dot code is a 2D barcode symbology composed of disconnected dots. It is widely used in the tobacco industry. Recently, Dynamsoft rolled out barcode reader SDK v7.4, which added DotCode support. In this post, I will share a command-line app and a GUI app, demonstrating how to build Java DotCode reader on Windows 10.
Decoding DotCode in Java Command-Line App
The command-line app is simple. What I am going to do is to invoke an API to decode DotCode from an image file.
By default, the SDK will decode all supported barcode formats. If you want to focus on DotCode and speed up the decoding process, disable other 1D and 2D barcode formats:
A Webcam DotCode Reader Built with OpenCV Java and Java Swing
A GUI app needs more effort.
How to install OpenCV Java?
The OpenCV Java SDK contains a jar package and a shared library. For Windows users, you just need to install the pre-built package and find the OpenCV Java SDK at opencv-4.3\opencv\build\java. Since I’m using a Maven project, I have to install the jar file to the Maven local repository beforehand:
What about the dll file? If you don’t put the dll in the right place, you will get the error log as loading the library:
Exception in thread "main" java.lang.UnsatisfiedLinkError: no opencv_java430 in java.library.path
        at java.lang.ClassLoader.loadLibrary(ClassLoader.java:1867)
        at java.lang.Runtime.loadLibrary0(Runtime.java:870)
        at java.lang.System.loadLibrary(System.java:1122)
        at com.java.barcode.App.main(App.java:65)
Here are workarounds for the issue.
Check the available java library path. Copy the dll file to current working directory or add the dll path to system environment PATH:
Dynamsoft Barcode Reader C++ SDK is available for Windows, Linux, and Mac (iOS and Android editions are coming soon). I have shared an article that illustrates how to build webcam barcode reader in Python. In this tutorial, I’ll use a different C++ API to implement barcode scanner applications for Windows and Raspberry Pi with a webcam.
       VideoCapture cap(0);
       if (!cap.isOpened())
              return -1;
       Mat frame;
       for (;;)
       {
              cap >> frame; // Get a new frame from camera
              imshow(windowName, frame); // Display the new frame
              if (waitKey(30) >= 0)
                     break;
       }
Porting the source code from Windows to Linux is a little bit tricky because DIB structure is not defined on Linux platform. We can define it ourselves:
typedef unsigned long       DWORD;
typedef long LONG;
typedef unsigned short      WORD;

typedef struct tagBITMAPINFOHEADER {
      DWORD biSize;
        LONG  biWidth;
          LONG  biHeight;
            WORD  biPlanes;
              WORD  biBitCount;
                DWORD biCompression;
                  DWORD biSizeImage;
                    LONG  biXPelsPerMeter;
                      LONG  biYPelsPerMeter;
                        DWORD biClrUsed;
                          DWORD biClrImportant;

} BITMAPINFOHEADER;
OpenCV officially provides both C++ and Python APIs for developers. Most of the time, developers just need to use one kind of programming languages to read, write and process images with hundreds of computer vision algorithms. However, if you want to use OpenCV Python APIs with an extended C/C++ library, it will be tricky to pass the data. In this article, I will share how to read camera stream with OpenCV-Python and detect barcode with Dynamsoft C/C++ Barcode SDK.
How to get the C/C++ pointer that pointing to numpy.ndarray?
According to the OpenCV source file opencv\modules\python\src2\cv2.cv.hpp, we can use the following code to get the memory address of the data in C:
    PyObject *o;
    if (!PyArg_ParseTuple(args, "O", &o))
        return NULL;

    PyObject *ao = PyObject_GetAttrString(o, "__array_struct__");
    PyObject *retval;

    if ((ao == NULL) || !PyCObject_Check(ao)) {
        PyErr_SetString(PyExc_TypeError, "object does not have array interface");
        return NULL;
    }

    PyArrayInterface *pai = (PyArrayInterface*)PyCObject_AsVoidPtr(ao);
    if (pai->two != 2) {
        PyErr_SetString(PyExc_TypeError, "object does not have array interface");
        Py_DECREF(ao);
        return NULL;
    }

    // Construct data with header info and image data
    char *buffer = (char*)pai->data; // The address of image data
    int width = pai->shape[1];       // image width
    int height = pai->shape[0];      // image height
    int size = pai->strides[0] * pai->shape[0]; // image size = stride * height
How to use the barcode detection API?
You can’t just pass the data pointer directly to DBR_DecodeBuffer(). The data needs to be reconstructed with some extra information:
    char *total = (char *)malloc(size + 40); // buffer size = image size + header size
    memset(total, 0, size + 40);
    BITMAPINFOHEADER bitmap_info = {40, width, height, 0, 24, 0, size, 0, 0, 0, 0};
    memcpy(total, &bitmap_info, 40);

    // Copy image data to buffer from bottom to top
    char *data = total + 40;
    int stride = pai->strides[0];
    for (int i = 1; i <= height; i++) {
        memcpy(data, buffer + stride * (height - i), stride);
        data += stride;
    }
Read barcode from images and return results:
// Dynamsoft Barcode Reader initialization
    __int64 llFormat = (OneD | QR_CODE | PDF417 | DATAMATRIX);
    int iMaxCount = 0x7FFFFFFF;
    ReaderOptions ro = {0};
    pBarcodeResultArray pResults = NULL;
    ro.llBarcodeFormat = llFormat;
    ro.iMaxBarcodesNumPerPage = iMaxCount;
    printf("width: %d, height: %d, size:%d\n", width, height, size);
    int iRet = DBR_DecodeBuffer((unsigned char *)total, size + 40, &ro, &pResults);
    printf("DBR_DecodeBuffer ret: %d\n", iRet);
    free(total); // Do not forget to release the constructed buffer

    // Get results
    int count = pResults->iBarcodeCount;
    pBarcodeResult* ppBarcodes = pResults->ppBarcodes;
    pBarcodeResult tmp = NULL;
    retval = PyList_New(count); // The returned Python object
    PyObject* result = NULL;
    for (int i = 0; i < count; i++)
    {
        tmp = ppBarcodes[i];
        result = PyString_FromString(tmp->pBarcodeData);
        printf("result: %s\n", tmp->pBarcodeData);
        PyList_SetItem(retval, i, Py_BuildValue("iN", (int)tmp->llFormat, result)); // Add results to list
    }
    // release memory
    DBR_FreeBarcodeResults(&pResults);
What if you see the error ‘Unable to find vcvarsall.bat’ when building Python extension on Windows?
According to the answer from StackOverflow, execute the following command based on the version of Visual Studio installed:
Visual Studio 2010 (VS10): SET VS90COMNTOOLS=%VS100COMNTOOLS%
Visual Studio 2012 (VS11): SET VS90COMNTOOLS=%VS110COMNTOOLS%
Visual Studio 2013 (VS12): SET VS90COMNTOOLS=%VS120COMNTOOLS%
Visual Studio 2015 (VS14): SET VS90COMNTOOLS=%VS140COMNTOOLS%
I’m using Visual Studio 2015, and thus I can build Python extension as follows:
SET VS90COMNTOOLS=%VS140COMNTOOLS%
python setup.py build install
Python Script for Testing
Open camera:
import cv2
from dbr import *
import time

vc = cv2.VideoCapture(0)
Previously, I wrote an article Raspberry Pi Barcode Scanner with Webcam and Python illustrating how to build a simple barcode scanner using Dynamsoft Barcode Reader SDK and OpenCV from scratch. The method decodeFile() was used for detecting barcodes from an image file. To use the API, you have to write image buffer that obtained by OpenCV API to a file beforehand. Because the I/O operation takes too much time, this API is not suitable for real-time barcode detection from webcam video stream. Considering this scenario, I have added a new Python API decodeBuffer(). In this article, I will illustrate how to create and use the new API.
Because the source code is transplanted from Windows edition, we have to define following types and structure:
typedef unsigned long DWORD;
typedef long LONG;
typedef unsigned short WORD;

typedef struct tagBITMAPINFOHEADER {
  DWORD biSize;
  LONG biWidth;
  LONG biHeight;
  WORD biPlanes;
  WORD biBitCount;
  DWORD biCompression;
  DWORD biSizeImage;
  LONG biXPelsPerMeter;
  LONG biYPelsPerMeter;
  DWORD biClrUsed;
  DWORD biClrImportant;
} BITMAPINFOHEADER;
Convert the numpy data from Python to C in decodeBuffer(). Besides that, we have to construct a buffer for barcode reading:
#include <ndarraytypes.h>

static PyObject *
decodeBuffer(PyObject *self, PyObject *args)
{
    PyObject *o;
    if (!PyArg_ParseTuple(args, "O", &o))
        return NULL;

    PyObject *ao = PyObject_GetAttrString(o, "__array_struct__");
    PyObject *retval;

    if ((ao == NULL) || !PyCObject_Check(ao)) {
        PyErr_SetString(PyExc_TypeError, "object does not have array interface");
        return NULL;
    }

    PyArrayInterface *pai = (PyArrayInterface*)PyCObject_AsVoidPtr(ao);
    if (pai->two != 2) {
        PyErr_SetString(PyExc_TypeError, "object does not have array interface");
        Py_DECREF(ao);
        return NULL;
    }

    // Construct data with header info and image data
    char *buffer = (char*)pai->data; // The address of image data
    int width = pai->shape[1];       // image width
    int height = pai->shape[0];      // image height
    int size = pai->strides[0] * pai->shape[0]; // image size = stride * height
    char *total = (char *)malloc(size + 40); // buffer size = image size + header size
    memset(total, 0, size + 40);
    BITMAPINFOHEADER bitmap_info = {40, width, height, 0, 24, 0, size, 0, 0, 0, 0};
    memcpy(total, &bitmap_info, 40);

    // Copy image data to buffer from bottom to top
    char *data = total + 40;
    int stride = pai->strides[0];
    int i = 1;
    for (; i <= height; i++) {
        memcpy(data, buffer + stride * (height - i), stride);
        data += stride;
    }

    // Dynamsoft Barcode Reader initialization
    __int64 llFormat = (OneD | QR_CODE | PDF417 | DATAMATRIX);
    int iMaxCount = 0x7FFFFFFF;
    ReaderOptions ro = {0};
    pBarcodeResultArray pResults = NULL;
    ro.llBarcodeFormat = llFormat;
    ro.iMaxBarcodesNumPerPage = iMaxCount;
    printf("width: %d, height: %d, size:%d\n", width, height, size);
    int iRet = DBR_DecodeBuffer((unsigned char *)total, size + 40, &ro, &pResults);
    printf("DBR_DecodeBuffer ret: %d\n", iRet);
    free(total); // Do not forget to release the constructed buffer

    // Get results
    int count = pResults->iBarcodeCount;
    pBarcodeResult* ppBarcodes = pResults->ppBarcodes;
    pBarcodeResult tmp = NULL;
    retval = PyList_New(count); // The returned Python object
    PyObject* result = NULL;
    i = 0;
    for (; i < count; i++)
    {
        tmp = ppBarcodes[i];
        result = PyString_FromString(tmp->pBarcodeData);
        printf("result: %s\n", tmp->pBarcodeData);
        PyList_SetItem(retval, i, Py_BuildValue("iN", (int)tmp->llFormat, result)); // Add results to list
    }
    // release memory
    DBR_FreeBarcodeResults(&pResults);

    Py_DECREF(ao);
    return retval;
}
Raspberry Pi Barcode Scanner
How to set video frame rate, frame width, and frame height?
from picamera.array import PiRGBArray
from picamera import PiCamera
import time
import cv2

# initialize the camera and grab a reference to the raw camera capture
camera = PiCamera()
rawCapture = PiRGBArray(camera)

# allow the camera to warmup
time.sleep(0.1)

# grab an image from the camera
camera.capture(rawCapture, format="bgr")
image = rawCapture.array

# Barcode detection
results = decodeBuffer(image)
The next step is to install Python and NumPy. Python is pre-installed on macOS. The default version is not compatible with the latest OpenCV. Therefore, you need to install the latest Python using Homebrew.
Get native image data that decoded by OpenCV Python API:
    PyObject *o;
    if (!PyArg_ParseTuple(args, "O", &o))
        return NULL;

    PyObject *ao = PyObject_GetAttrString(o, "__array_struct__");
    PyObject *retval;

    if ((ao == NULL) || !PyCObject_Check(ao)) {
        PyErr_SetString(PyExc_TypeError, "object does not have array interface");
        return NULL;
    }

    PyArrayInterface *pai = (PyArrayInterface*)PyCObject_AsVoidPtr(ao);
    if (pai->two != 2) {
        PyErr_SetString(PyExc_TypeError, "object does not have array interface");
        Py_DECREF(ao);
        return NULL;
    }

    char *buffer = (char*)pai->data; // The address of image data
    int width = pai->shape[1];       // image width
    int height = pai->shape[0];      // image height
    int size = pai->strides[0] * pai->shape[0]; // image size = stride * height
Define BITMAPINFOHEADER structure. The DWORD defined by Microsoft is unsigned long, but here it is unsigned int. The size of the type should be 4 bytes.
typedef unsigned int DWORD;
typedef int LONG;
typedef unsigned short WORD;

#pragma pack(push)
#pragma pack(1)

typedef struct tagBITMAPINFOHEADER {
  DWORD biSize;
  LONG biWidth;
  LONG biHeight;
  WORD biPlanes;
  WORD biBitCount;
  DWORD biCompression;
  DWORD biSizeImage;
  LONG biXPelsPerMeter;
  LONG biYPelsPerMeter;
  DWORD biClrUsed;
  DWORD biClrImportant;
} BITMAPINFOHEADER;

#pragma pack(pop)
Construct a buffer with bitmap header info for barcode detection.
int dib_header_size = sizeof(BITMAPINFOHEADER);

char *total = (char *)malloc(size + dib_header_size); // buffer size = image size + header size
memset(total, 0, size + dib_header_size);
BITMAPINFOHEADER bitmap_info = {dib_header_size, width, height, 0, 24, 0, size, 0, 0, 0, 0};
memcpy(total, &bitmap_info, dib_header_size);

// Copy image data to buffer from bottom to top
char *data = total + dib_header_size;
int stride = pai->strides[0];
int i = 1;
for (; i <= height; i++) {
    memcpy(data, buffer + stride * (height - i), stride);
    data += stride;
}
int iRet = DBR_DecodeBuffer((unsigned char *)total, size + dib_header_size, &ro, &pResults);
Get and return barcode results:
    int count = pResults->iBarcodeCount;
    pBarcodeResult* ppBarcodes = pResults->ppBarcodes;
    pBarcodeResult tmp = NULL;
    retval = PyList_New(count); // The returned Python object
    PyObject* result = NULL;
    i = 0;
    for (; i < count; i++)
    {
        tmp = ppBarcodes[i];
        result = PyString_FromString(tmp->pBarcodeData);
        printf("result: %s\n", tmp->pBarcodeData);
        PyList_SetItem(retval, i, Py_BuildValue("iN", (int)tmp->llFormat, result)); // Add results to list
    }
    // release memory
    DBR_FreeBarcodeResults(&pResults);